

Jira does not ship with a built-in issue-template feature: you can clone a single issue, but you cannot save a reusable template, automatically create structured sub-task hierarchies, or trigger issue creation from a transition or field change. STM Issue Templates is the long-running Atlassian Marketplace plugin (4.6/5 from 20+ reviews) that adds those capabilities to Jira — both Cloud and Data Center.
STM works with any Jira project type — Jira Software, Jira Service Management, and Jira Business / Work Management — and can create issues across projects in the same Jira instance. If you can create the issue by hand, STM can create it from a template.
This page is the canonical reference for everything STM can do. If you want ready-made template examples to copy into your Jira instance, the Jira Issue Templates library has 20+ examples — bug reports, release notes, postmortems, RFCs, sprint retros, and more.
Important. The fields that are displayed and the fields that can be copied from the parent are dependent on having been set up for the Create Issue screen in the project (Project Administration → Screens → Create Issue). If, for example, the due date is not in the project’s create screen then it will not appear as an entry field in the Create Issue view or as a copy-from-parent checkbox.
Warning. Creating issues during transitions or the creation of other issues is a powerful feature. Be careful not to set up loops (Issue A’s creation causes Issue B to be created which causes Issue C to be created…).

What are Jira issue templates?
Jira issue templates are reusable definitions of one or more issues — sub-tasks, linked issues, epic issues, or unconnected issues — that can be created repeatedly with consistent fields, assignees, watchers, and structure. A single trigger (manual click, issue creation, status transition, or field change) creates the entire issue set. Templates are how Jira teams enforce a standard process: every bug report has the same investigation sub-tasks, every release ticket spawns the same QA + docs sub-issues, every incident has the same postmortem checklist.
Common examples (each with a ready-made template in the Jira Issue Templates library):
- Bug reports with reproduction-steps and severity sub-tasks
- Release notes with QA, docs, and announcement sub-tasks
- Incident response with triage, customer-comms, and postmortem sub-issues
- RFCs with review, decision, and follow-up linked issues
- Sprint retrospectives with action-item sub-tasks per topic
- Deployment checklists with environment-specific sub-tasks
Does Jira have built-in issue templates?
No — neither Jira Cloud nor Jira Data Center has a native issue-template feature. The closest built-in option is Clone Issue, which creates a one-off copy of a single existing issue. It does not maintain a reusable template, does not create sub-task hierarchies, and cannot be triggered automatically.
STM closes this gap with project-level and global templates, executors that trigger templates on issue events, JQL-driven bulk-create / bulk-update, and update templates that modify existing issues. The plugin has been on the Atlassian Marketplace since 2014 and works on both Cloud and Data Center.
How does STM compare to other Jira template options?
The three tools STM evaluators most often weigh against it are Atlassian’s built-in Automation for Jira, Adaptavist’s ScriptRunner, and dedicated template apps like AppLiger’s Easy Issue Templates. Each occupies a different point on the no-code-to-pro-code spectrum.
STM vs Jira Automation
Atlassian’s built-in Automation for Jira can also create issues from rules, and for very small templates the two products overlap. The difference becomes apparent the moment a template grows beyond a handful of issues. STM customers regularly run templates with a large number of issue definitions — the same template authored in Automation would be unmaintainable, both in the rule editor and when someone has to debug it six months later.
In addition to scaling to large templates, STM has several capabilities that Automation does not:
- Cascading templates — one template runs other templates against each issue it creates, so you can build epic → story → sub-task hierarchies from a single trigger.
- JQL bulk-create and bulk-update — apply a template to every issue matching a JQL query, in one operation.
- Update Templates — first-class objects for modifying field values, watchers, and comments on existing issues, not just creating new ones.
- Project + global executor scope — one global executor can drive identical automation across many projects without duplication.
- Change-log audit — every template change is recorded for three months, so you can see who edited what and recover earlier template content.
- Repeating templates — run a template once per component or fix version on the parent issue, without writing a loop.
Rule of thumb: if your template is fewer than five issues with no hierarchy, Automation is probably enough. If it has more, or if you need to maintain, version, and share templates as first-class artefacts, STM is the better fit.
STM vs ScriptRunner for Jira
ScriptRunner (Adaptavist) is a Groovy scripting platform for Jira. It is far more general-purpose than STM: with enough scripting effort it can create sub-tasks, linked issues, and epics, listen for Jira events, and run workflow post-functions. Teams comfortable writing and maintaining Groovy can build template-like behaviour in ScriptRunner.
Where STM differs:
- Templates are first-class declarative objects, not code. Anyone with access to the Templates page can edit a template — there is no Groovy file to read, no version-control discipline to enforce, and no scripting-team dependency to schedule against. ScriptRunner’s Behaviours feature also explicitly does not support creating templates for sub-task types, which is one of STM’s most common use cases.
- No Groovy required. STM is configured through a UI by project admins, not engineers. Teams without a scripting culture can adopt it without taking on Groovy as a dependency.
- Specialisation. ScriptRunner is a broad platform; STM is a focused product for the template / executor / bulk-create use case. Each does its specialty better than the other does as a side-feature.
Many teams run both: ScriptRunner for the bespoke automation that doesn’t fit a templating model, STM for everything that does.
STM vs Easy Agile / Easy Issue Templates
Easy Agile (the vendor) does not actually ship a template product — their portfolio is agile-process tooling (User Story Maps, Programs, Roadmaps, TeamRhythm, Personas). They’re often mentioned in the same evaluation but they don’t compete head-to-head with STM.
The closest direct competitor on Marketplace is Easy Issue Templates (AppLiger), which also creates templated hierarchies on Cloud and Data Center across Software, Service Management, and Work Management projects, with variables and dynamic field values.
Where STM differs from dedicated template apps like Easy Issue Templates:
- Executors. STM’s Executor model lets a template fire automatically on issue creation, transition, or field change — and is the same model whether scoped to one project or many. Most dedicated template apps focus on manual / create-time templates only.
- Update Templates and JQL bulk-update. STM treats updating existing issues as a first-class scenario, not just creating new ones. You can apply an Update Template against every issue matching a JQL query.
- Transition orchestration. STM can transition parent and related issues based on what their children do (first-child or last-child transitions), and transition children when the parent moves. This is part of the same template/executor system, not a separate feature you bolt on.
- Maturity. STM has been on the Marketplace since 2014; the executor + cascade + JQL bulk-update feature set has been refined over many years of customer feedback.
If your use case is purely “create a structured issue hierarchy from a saved template”, several apps in this category do that well. If you also need automatic firing, update-templates, transition orchestration, or JQL-driven bulk operations as part of the same product, STM is built for that combination.
How do you create Jira issue templates with STM?
Templates can be defined at two scopes:
- Project templates — visible only inside the project where they are created. Managed from the project’s add-on menu (Cloud) or project menu (Data Center). Access is limited to project admins, or to the user groups listed in the configuration’s Project Template Access list.
- Global templates — visible to any project. Managed from the STM Global Templates menu. Access is limited to system admins, or to the user groups listed in the configuration’s Global Template Access list. Global templates have one extra option: Show in Issues for Bulk Create pages — when checked, the template is offered on the bulk-create pages of every project that imports it. Either way, global templates are always available to executors.
The dialog that creates and edits a template is identical in both screens — the only differences are scope, who can see the screen, and that one extra checkbox.
Where to find the template pages
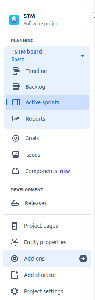
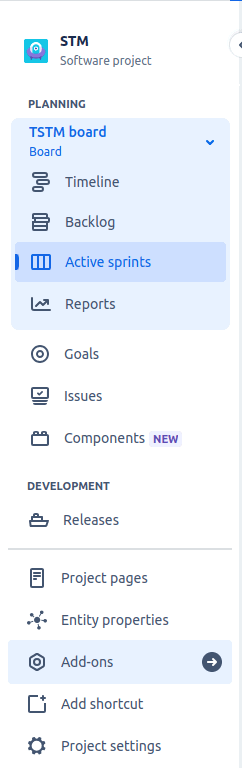
Cloud Project Menu
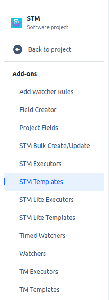
Cloud Add-ons Menu
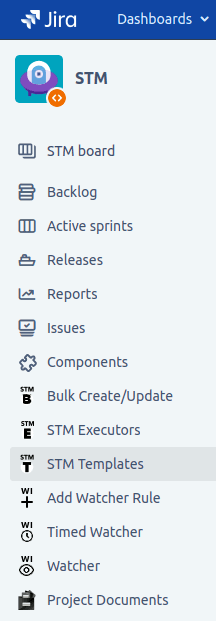
Data Center Menu
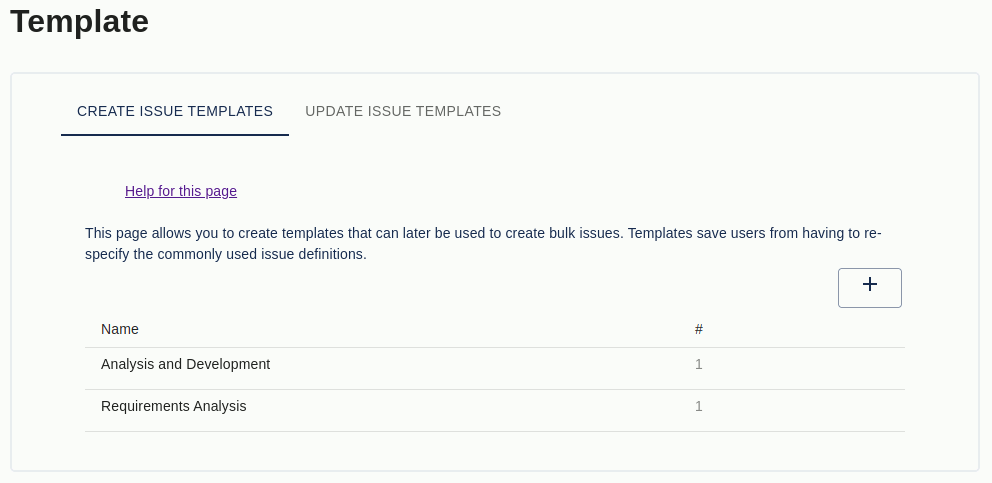
The image below shows the template list page. Hover over a template to reveal the icons: sort issues in the template (up/down arrows), edit (pencil), duplicate (copy), or delete (trash). New templates are added via the plus icon in the top-right corner.
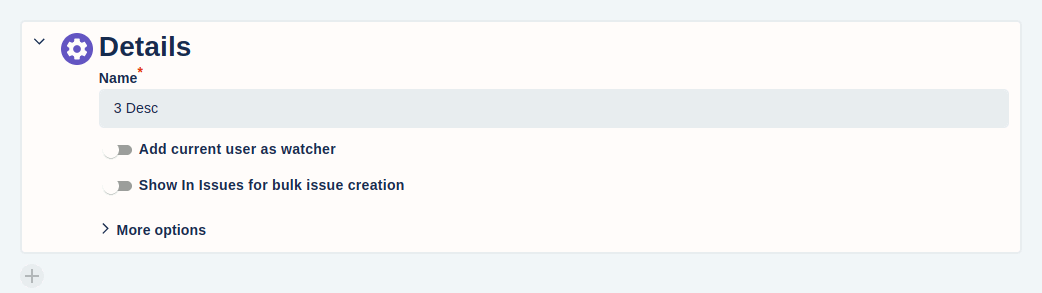
Details section
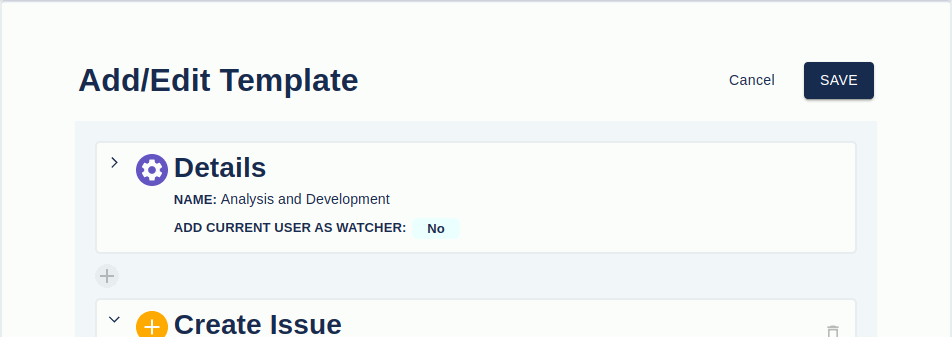
A template has a name (used to identify the issues it creates), an Add current user as watcher checkbox (adds the current user as watcher on every issue created), and optional documentation fields revealed by Show more documentation options.
Create Issue section — field reference
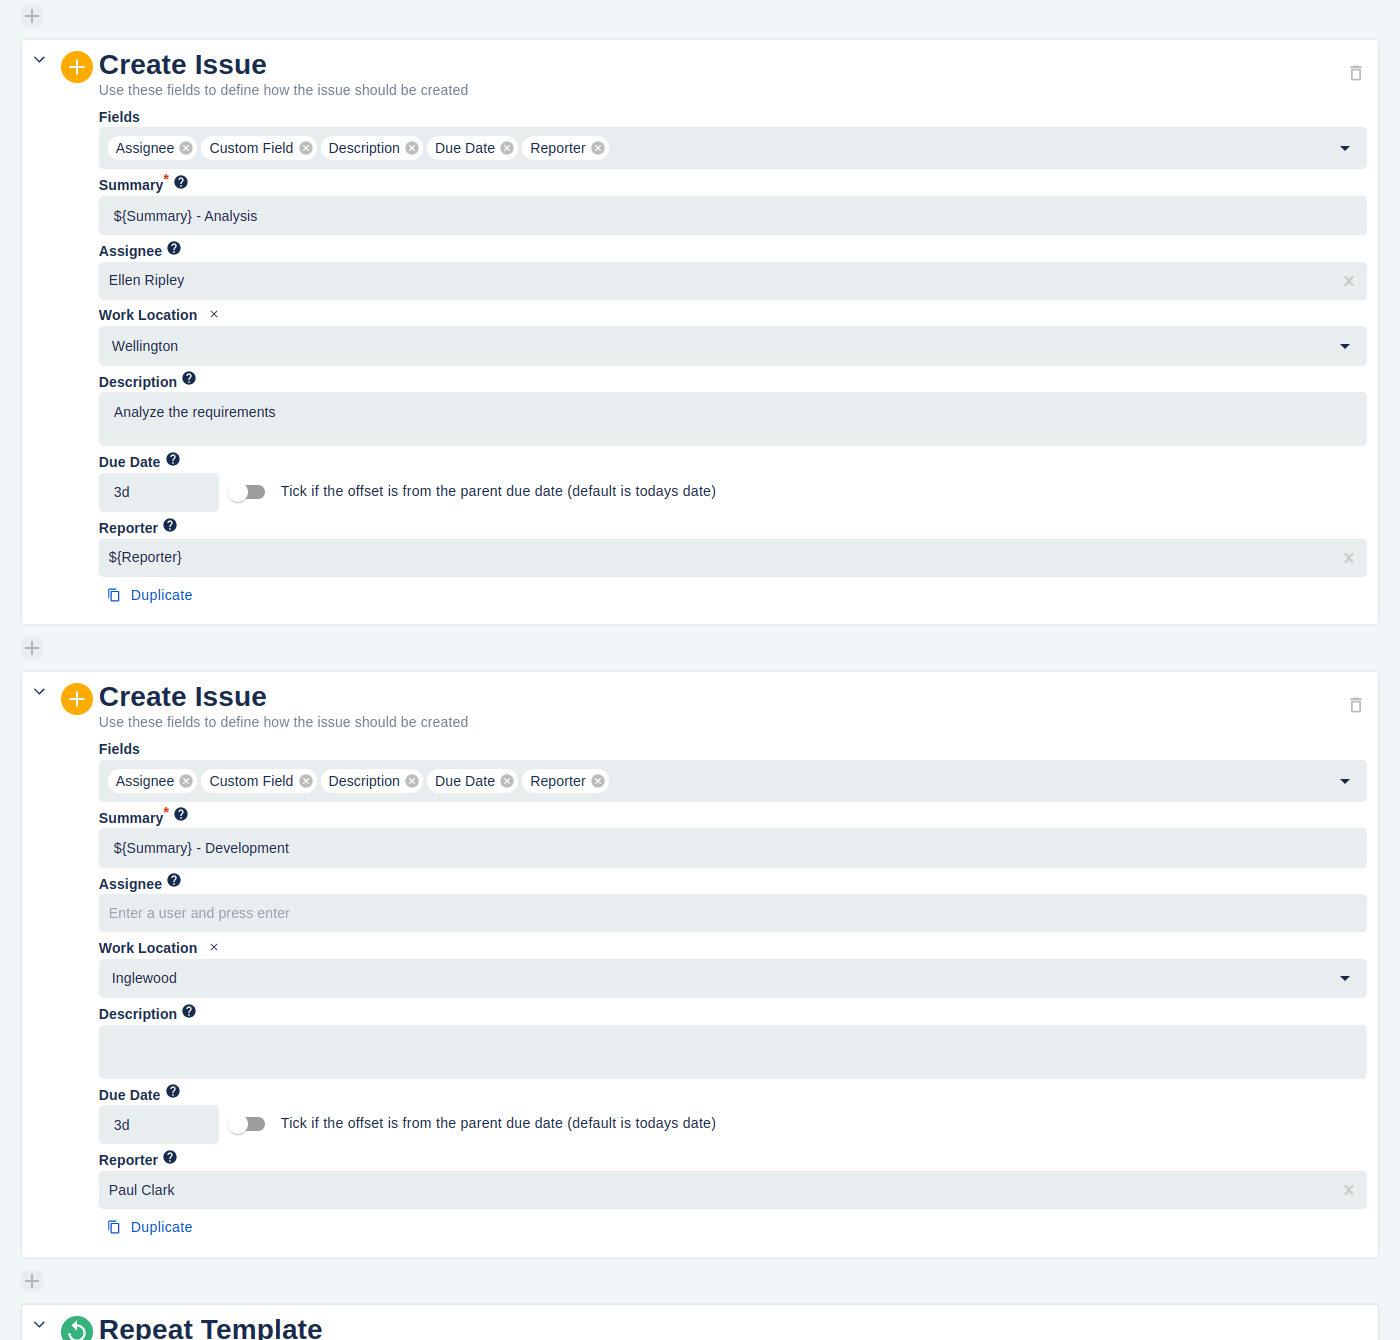
A template has one or more Create Issue sections — one per issue that should be created when the template runs. Hover over the question-mark icons in the editor for inline help.
The following fields are available on each Create Issue section:
- Summary — the issue summary. You can reference parent fields with
${Summary},${Description},${Type},${Assignee},${Reporter},${Priority}, or a custom field by name (${My Custom Field Name}). If the referenced field is empty, the literal stringnullis inserted unless you use$!{…}(which renders empty when the source is empty). References are case-sensitive. In a Repeating Template,${RepeatItem}gives you the value being iterated over. - Assignee — the user the issue will be assigned to.
${Reporter}or${Assignee}references the parent’s reporter or assignee. - Components — the component(s) the issue should have.
- Description — supports the same
${…}field references as Summary. - Due Date — either the literal
today, aYYYY-MM-DDdate, or an offset from the day the issue is created. The offset format is<months>m <weeks>w <days>din that order:1m 2w 3d= one month, two weeks, three days;2d= two days. - Original Estimate — minutes, hours, days, weeks in that order (
3d 4h,1w 10m); a percentage of the parent’s original estimate (20%); or a multiplier of the parent’s estimate (*0.25). - Fix Versions — fix-version values for the issue.
- Issue Type — the issue type for the new issue.
- Labels — labels to add.
- Priority — one of Jira’s pre-defined priorities.
- Reporter — start typing a username to pick from suggestions.
${Reporter}and${Assignee}work here too. - Custom Fields — up to five custom fields of type single-line text, multi-line text, number, single-select list, multi-select list, or URL.
- Project Key — destination project for the new issue (cannot be used for sub-tasks). This is how a template in project A creates issues in project B — including across project categories: a trigger in a Jira Service Management project can create issues in a Jira Software project, or vice versa. The executing user must have create-issue permission in the destination project.
- Add Watcher — users to add as watchers of the created issue.
- Add Comment — a comment to post on the created issue.
Use the Fields to display dropdown to add more fields; click the X next to a field name to remove it. Empty fields shown but not filled in act as placeholders for the user when the template is run manually in bulk-create mode.
Copy From Parent
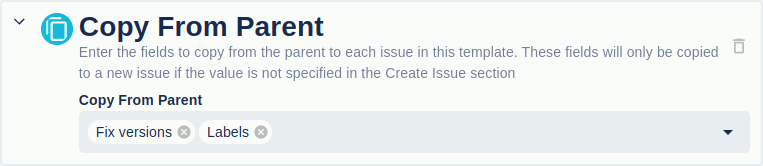
Pick parent-issue fields to copy verbatim onto every issue created by the template. You can select any number of fields, including custom fields. A copied field is overridden if the Create Issue section sets its own value for that field.
Cascading templates

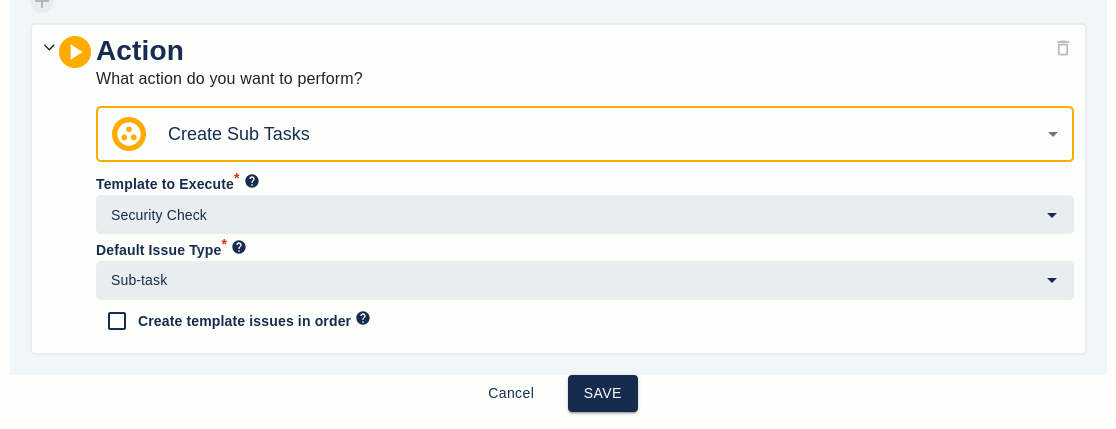
The Cascade Template section runs further templates against every issue this template creates. Only available for linked and unconnected issues (the cascaded template inherits the parent template’s relationship type).
Example: template A creates Development and Testing linked issues. Template A’s cascade list includes template B, which creates a single Security Check issue. When template A runs, four issues are created in total: Development and Testing (both linked to the source issue), plus a Security Check linked to each.
Repeating templates
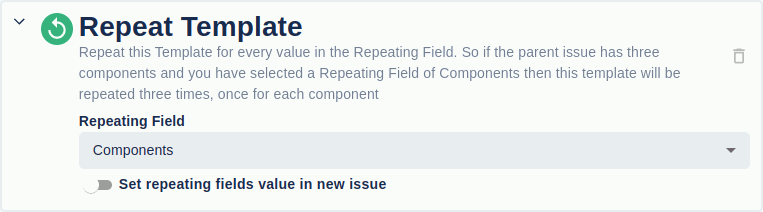
A repeating template runs once per value of a chosen field (Components or Fix Versions). If the template has two Create Issue sections and the parent has three components, six issues are created. If the field has no values, no issues are created.
Check Set Repeating fields value in Issue to set the iterated value on each created issue. With one Create Issue section and a Fix Versions repeat field where the parent has fix versions V1 and V2, you get two issues — the first with Fix Version V1, the second with V2.
Global template differences
The global template editor is almost identical to the project editor, except:
- It has the Show in Issues for Bulk Create pages checkbox described above.
- Pickers for issue type, priority, etc. show every possible value across every project (because a global template isn’t tied to one project). A value may be valid in the picker but invalid for the project where the template eventually runs — this is silently OK until the template runs in the wrong project, at which point the create will fail.
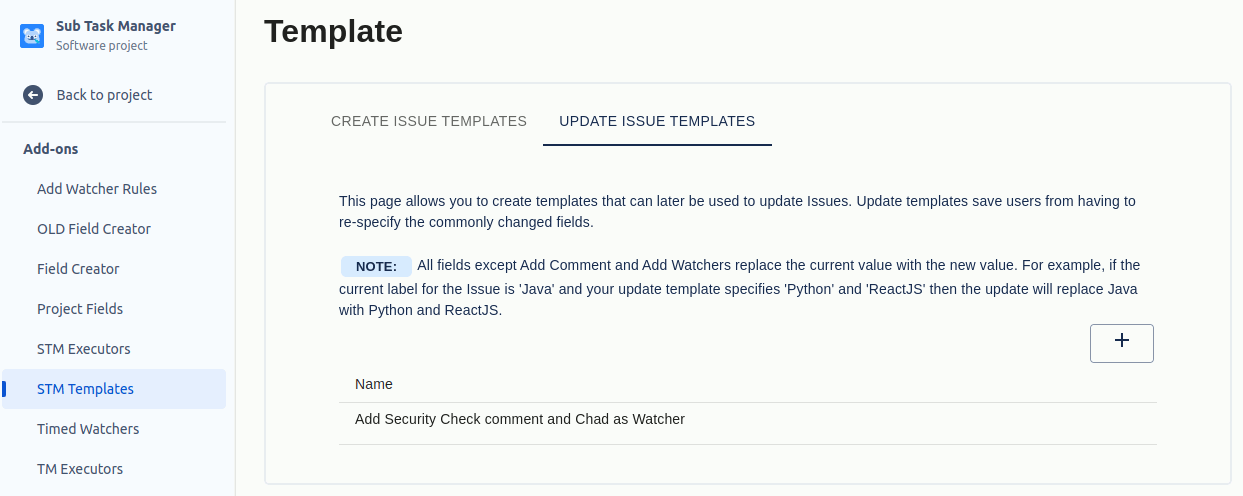
How do you update existing Jira issues with templates?
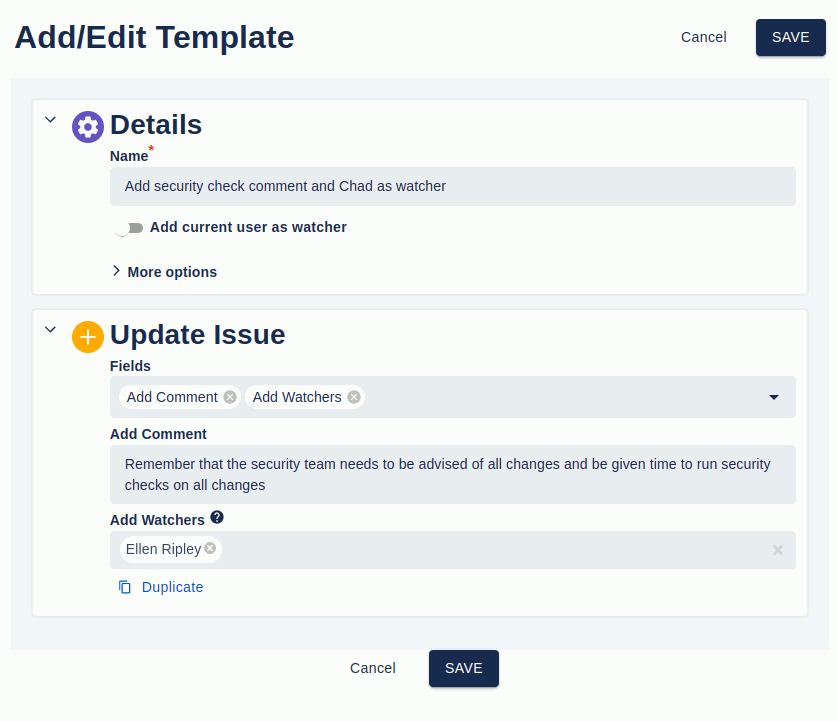
Update Templates modify the fields, comments, or watchers of an existing issue rather than creating a new one. The screen is structurally identical to the create-template screen; the only difference is that there is a single Update Issue section instead of one or more Create Issue sections.
Like create templates, update templates can be defined at project or global scope and follow the same access rules.
Note: every field except Add Comment and Add Watchers replaces the existing value. For a Labels field with current value Java, an Update Template specifying Python and ReactJS replaces Labels with Python, ReactJS — the Java label is removed.
The field reference (Summary, Assignee, Components, Description, Due Date, Original Estimate, Fix Versions, Issue Type, Labels, Priority, Reporter, Custom Fields, Project Key, Add Watcher, Add Comment) is identical to the create-template field reference above, including all the ${…} parent-field references.
To run an update template automatically, attach it to an Executor that triggers on issue creation, status transition, or field-value change.
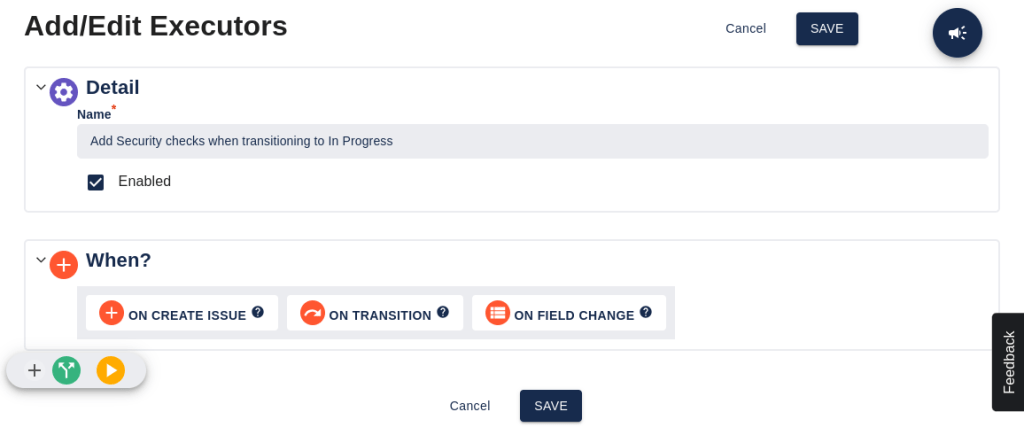
How do you automatically create or update Jira issues with executors?
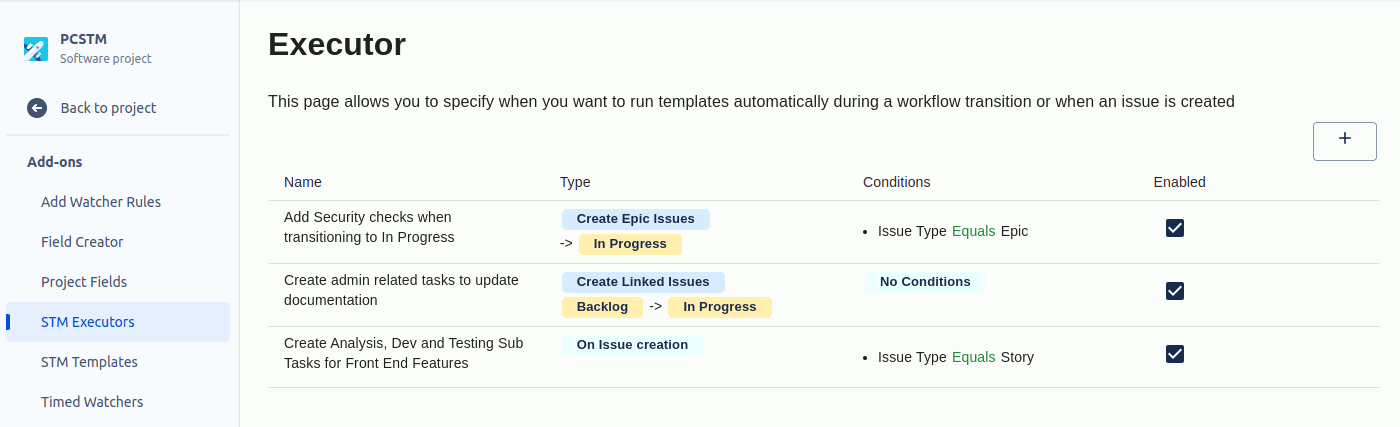
An Executor runs a template automatically when a triggering event happens. It is the glue between a template and an event on a Jira issue. Executors live next to templates and follow the same project / global scope rules: a Project Executor is configured per-project and limited to project admins; a Global Executor applies to all projects or a chosen list of projects and is configured by system admins.
The Executor list page lives at Project → Add-ons → STM Executors (project) or under the STM Global menu (global). Each executor shows its name, status, and (on hover) icons to move it, edit it, duplicate it, or delete it. Disabling an executor stops it firing without losing its configuration.
Trigger conditions
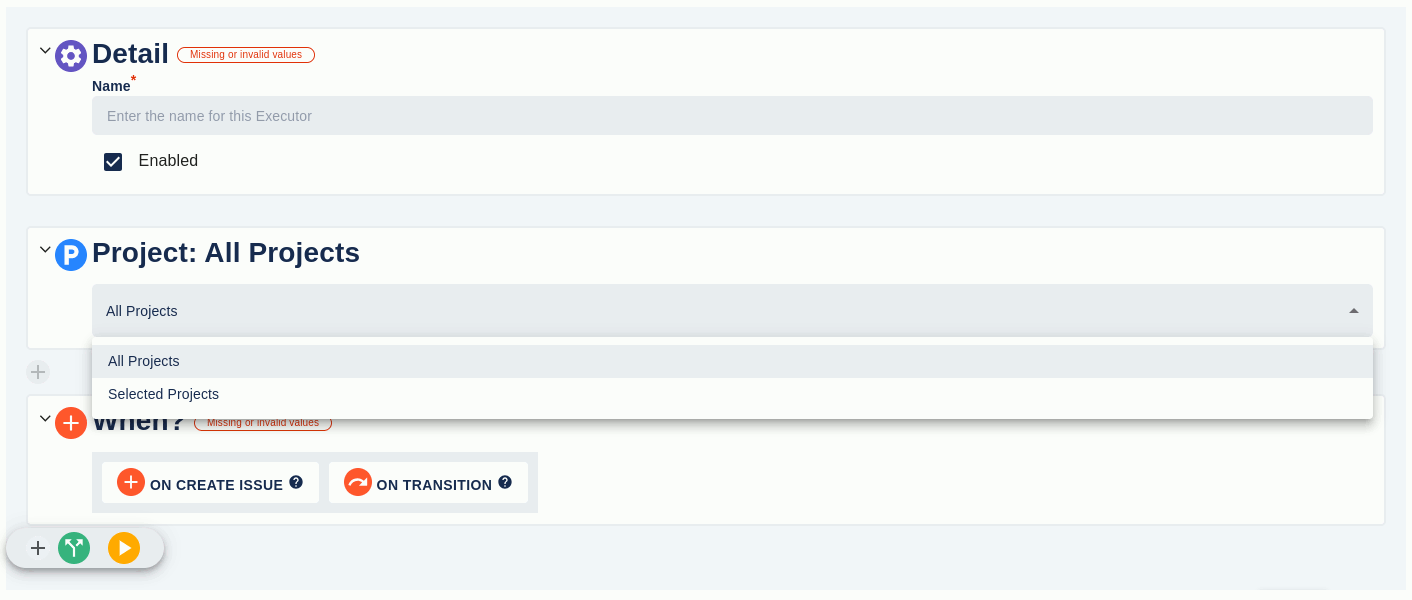
When you add an executor, the first decision is when it runs:
- On Create Issue — the executor fires when a new issue is created.
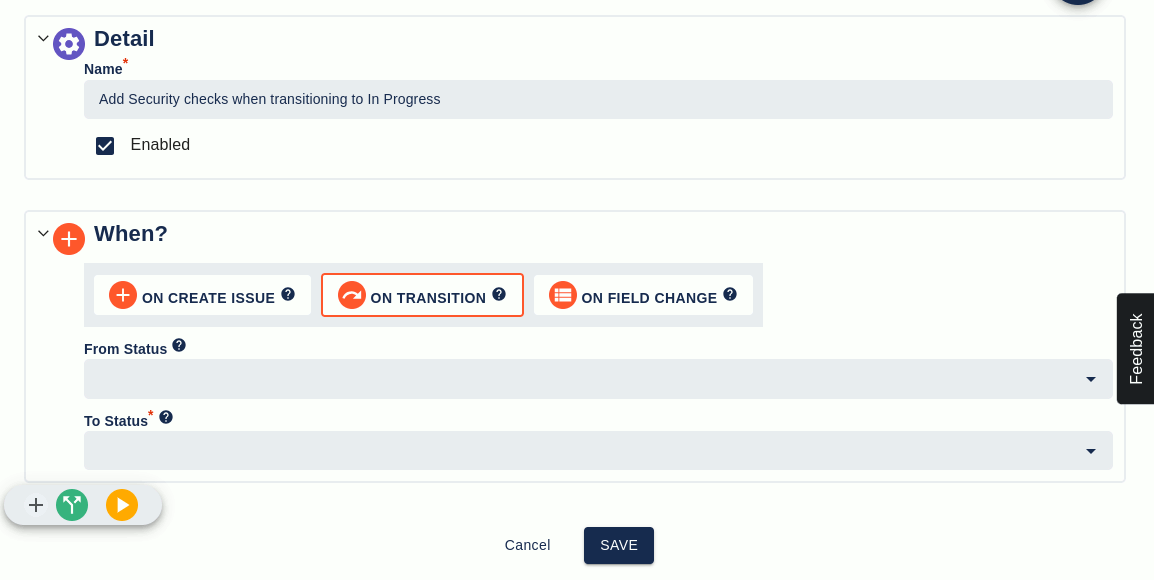
- On Transition — the executor fires when an issue transitions from one status to another. You specify a To Status (required) and optionally a From Status.
- On Field Change — the executor fires when a chosen field changes from blank to non-blank, non-blank to blank, or from one non-blank value to another.
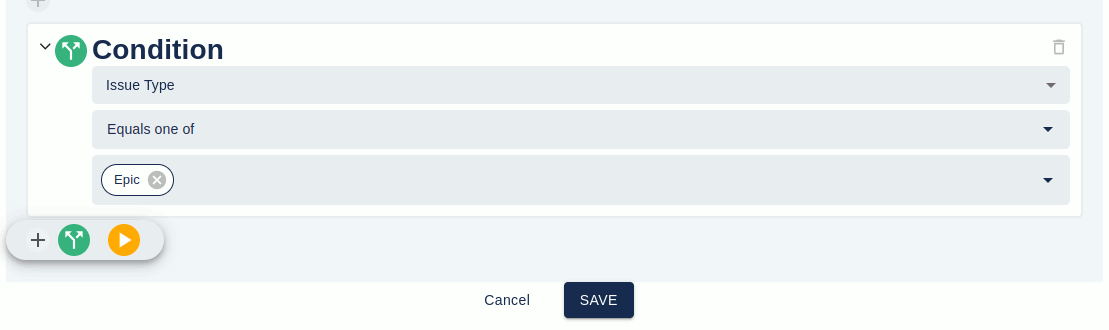
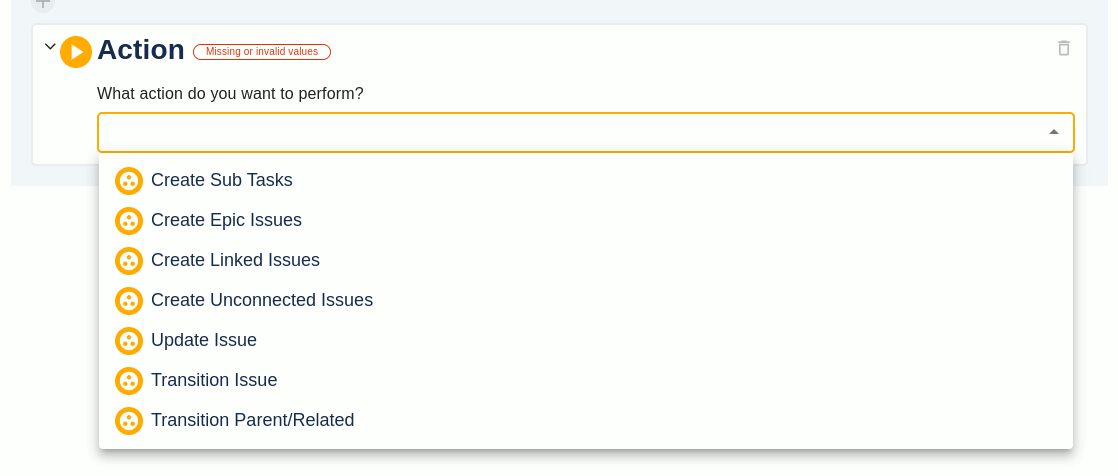
Conditions and actions
Once the trigger is set, build up the executor as a sequence of Conditions and Actions. Conditions narrow when the executor will actually do something (e.g. issue type must be Epic, current user must be a member of a specific group). Actions are what the executor does (create issues from a template, update an issue from a template, transition issues).
The plus icons between condition / action rows let you insert additional conditions or actions at any point.
Transitioning child issues
An executor can transition sub-tasks or linked child issues when the parent transitions. The rules:
- Child issues in the same project as the parent can only be transitioned to the same status the parent is moving to (a safety mechanism against runaway recursion).
- If a From Status is set, only issues currently on that status will be transitioned.
- Issues are only transitioned if the To Status is one transition away on the workflow.
Three transition modes are supported:
- Same status as parent — transition every matching child to whatever status the parent is moving to. Pick child type (sub-task or linked) and the relevant link types or issue types. Below: transition every
relates tolinked issue to the same status as the parent.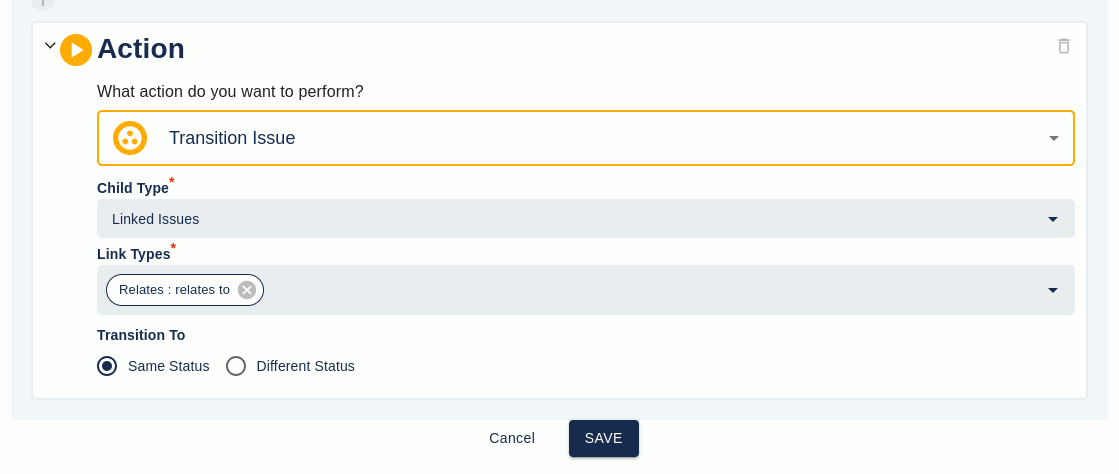
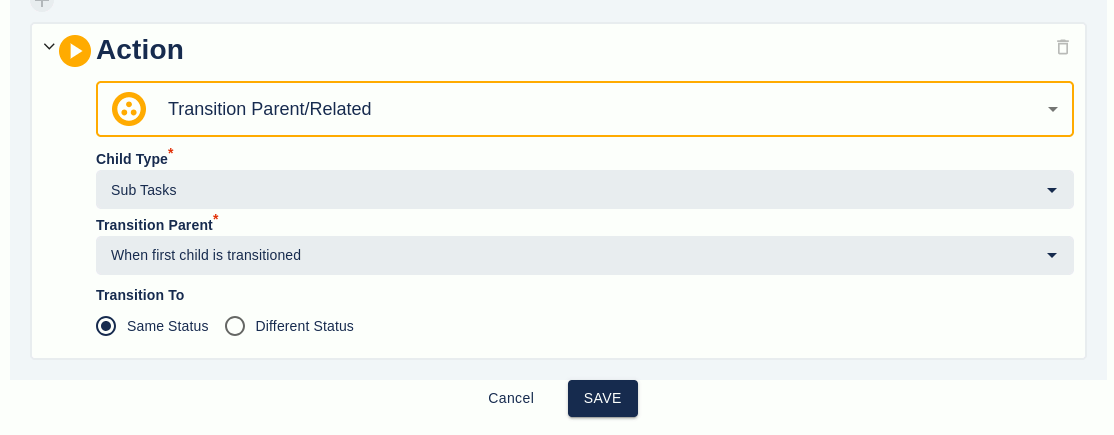
- One specific To Status, with optional From Status — transition matching child issues to a fixed status, regardless of the parent’s destination. Below: transition
relates tolinked issues to In Progress regardless of their starting status (but only if a one-step transition is available).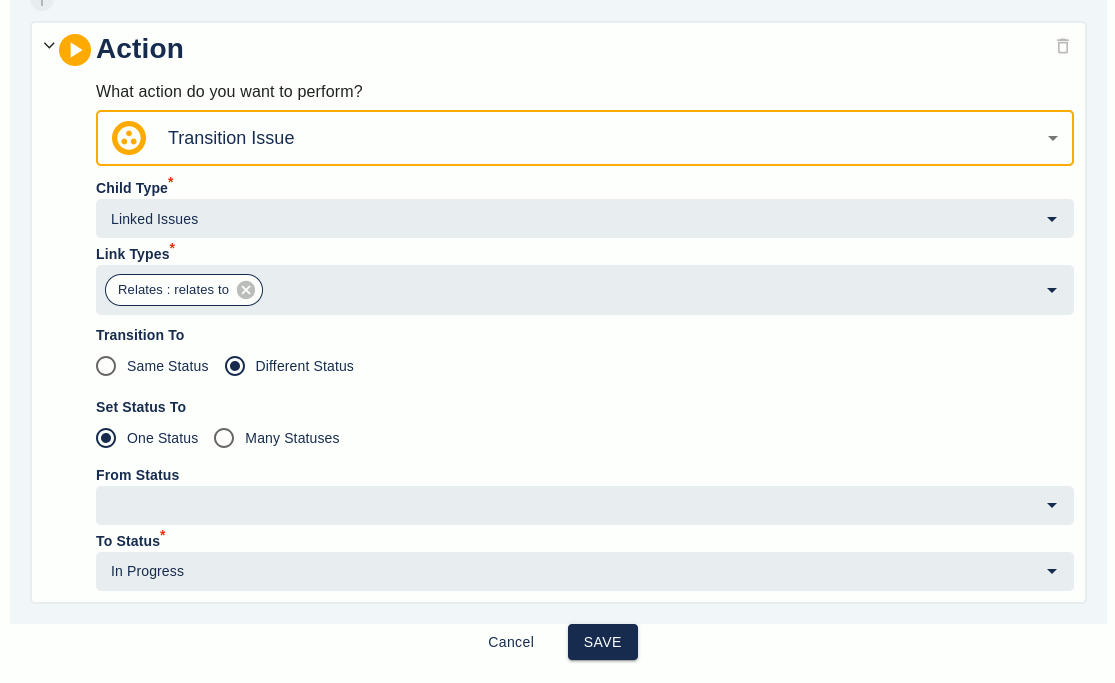
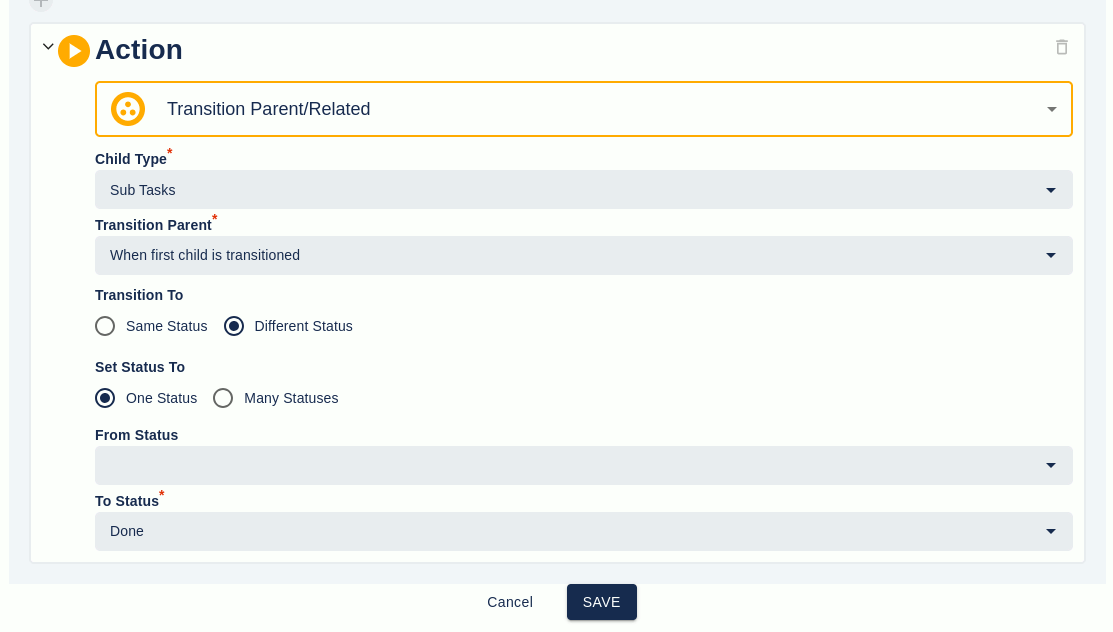
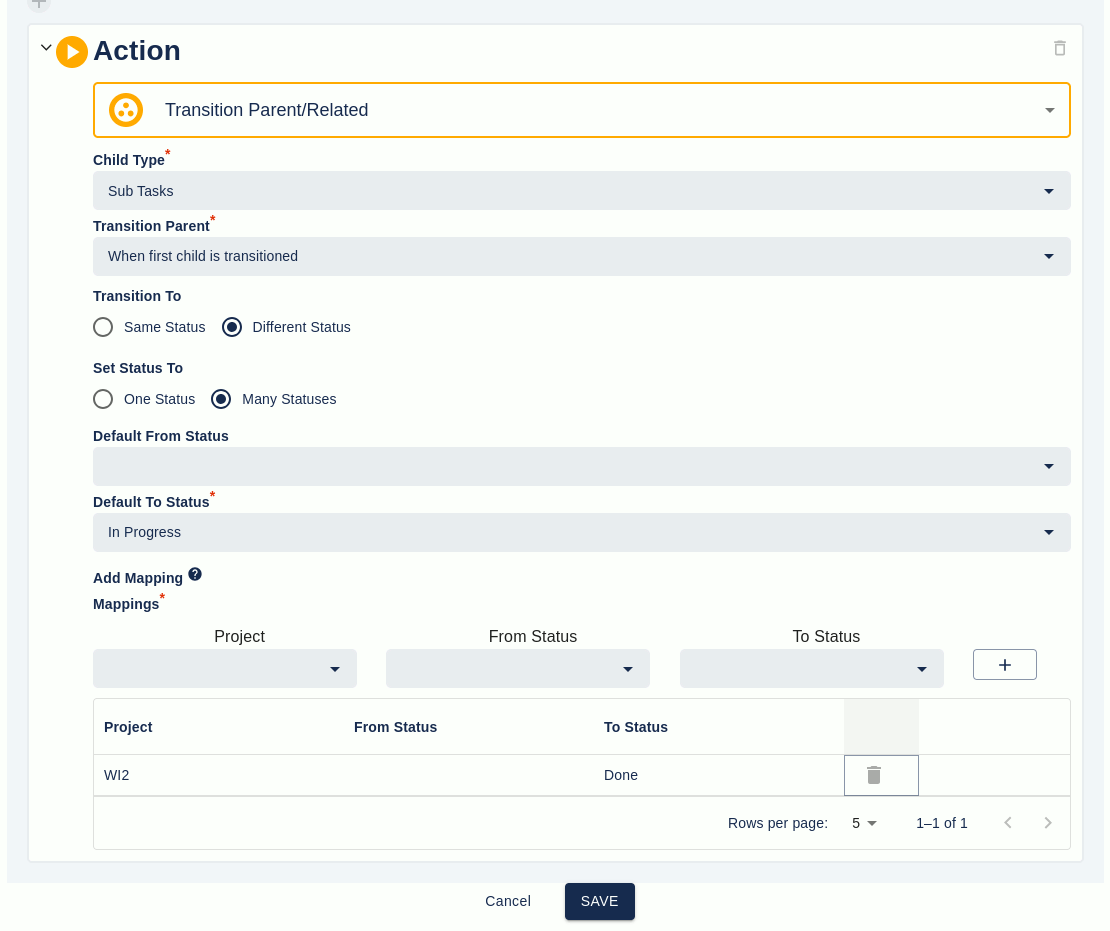
- Per-project From / To Status overrides — the most powerful mode: a default From / To plus per-project overrides. Below:
relates toissues in the WI2 project transition to In Progress only if they are currently on Backlog; in the current project they transition to In Progress from any starting status.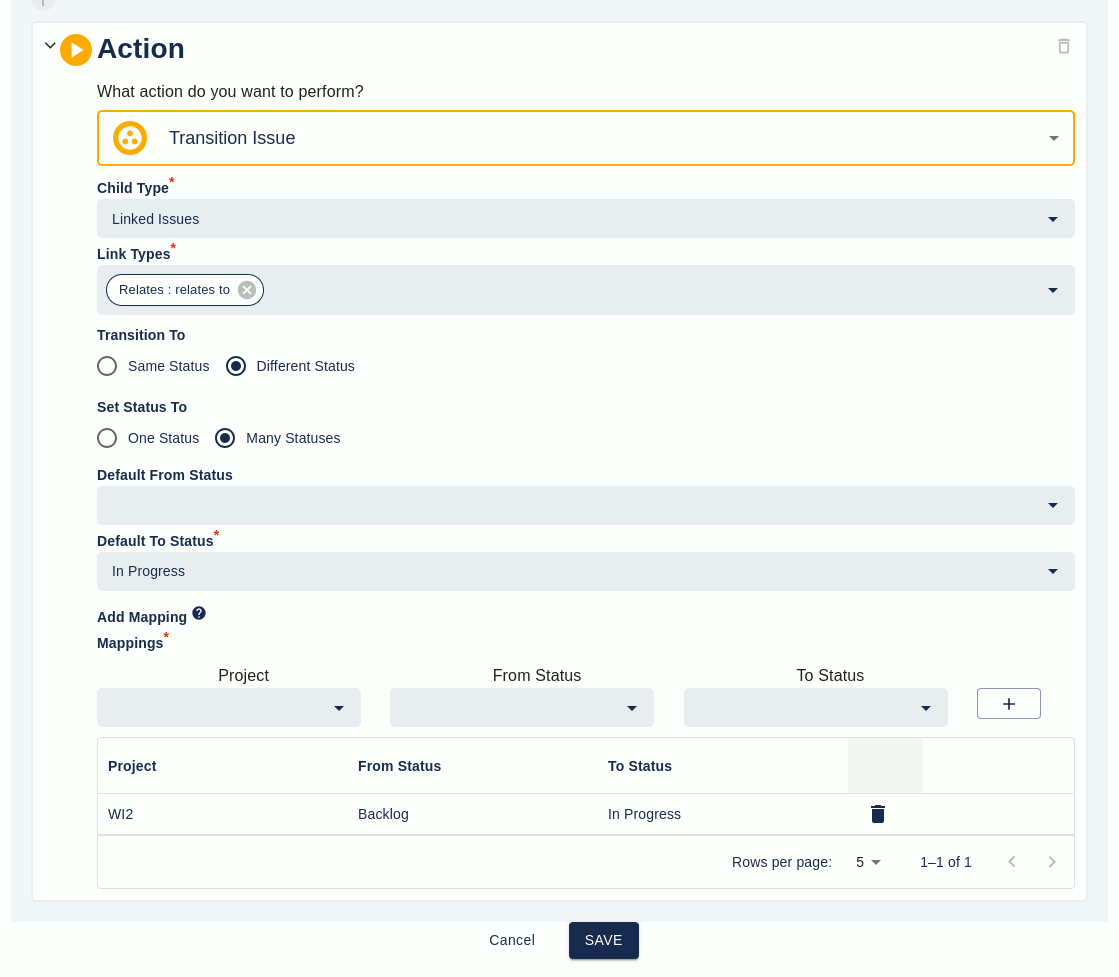
Transitioning parent or related issues
An executor can transition the parent (or a related issue) when its children transition. Two modes:
- First child — when the first child transitions to a chosen status, transition the parent. Example: parent A with sub-tasks B and C all on To Do. The moment B or C is moved to In Progress, A is moved to In Progress automatically.
- Last child — when the last remaining child transitions, transition the parent (typically to Done). Example: parent A with linked issues B and C; A and C are on To Do, B is on In Progress. When C is moved to In Progress, A transitions to Done.
Per-project overrides work for parent transitions too:
Global executors
Global Executors work identically to Project Executors except for one extra setting: they apply either to all projects or to a selected list of projects. This is how you run the same automation across multiple projects without duplicating the executor in each one.

Notifications, errors, and audit
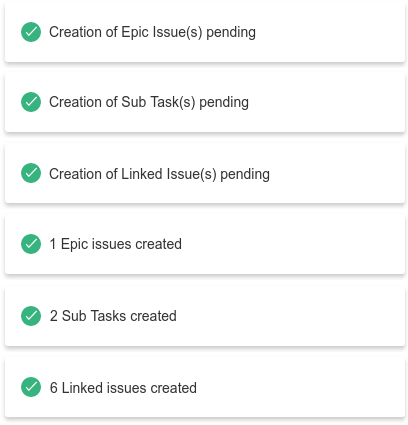
When an executor creates issues, the parent issue is refreshed and a status banner is shown. Pending and completed states each have their own message.
If the create fails, an alert dialog explains why.

Per-row run history (the easiest way to find problems)
The run history icon sits next to every row on the Templates and Executors lists. Click it and you see exactly when that template or executor was last used and what the outcome was — successful runs, partial failures, full failures, and the reason for each one.
This is the most direct way to track down a problem. When someone reports “the bug-triage template didn’t run”, you open the executor list, click the run-history icon next to its row, and you’re looking at the timeline of that specific executor. There’s no filtering through a project-wide aggregate to find the right entry.
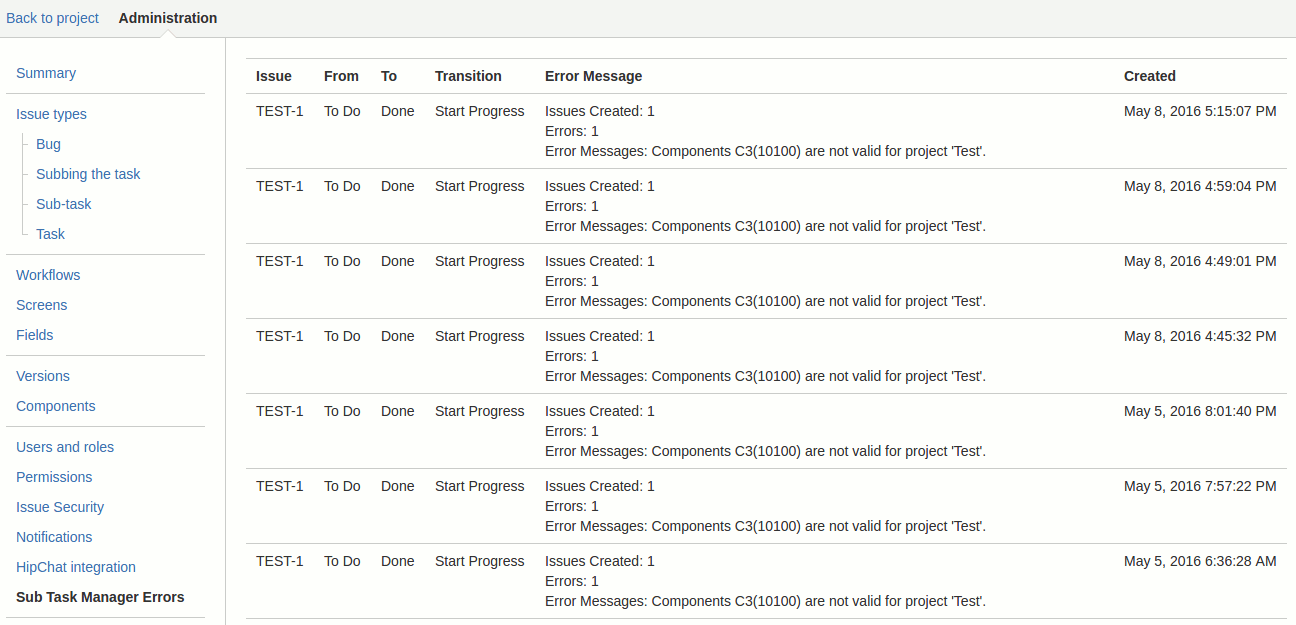
Project-wide Errors and Audit tabs
For an overall view across every template and executor in the project, the STM Errors and STM Audit tabs in the project administration screen list every error (Errors) and every run (Audit) in the project. Useful as a single source of truth when reviewing template health across the project, or for compliance reporting in regulated environments.
On partial failures. STM is not transactional — when a template hits an error mid-run, it creates as many of the remaining issues as it can rather than rolling back. Issues already created stay created. The run-history view, the error dialog shown to the user, and the project-wide Errors tab all record what failed and why, so you can correct the cause (often a field-value mismatch, a permission, or a workflow status that doesn’t exist in the destination project) and re-run the template against the parent issue.
How do you bulk-create or update Jira issues with STM?
There are two bulk paths: an interactive bulk-create dialog from the issue More menu, and a JQL-driven bulk-create / bulk-update page.
From the issue menu (one parent issue)
The Jira issue More menu has STM entries to create bulk sub-tasks, linked issues, epic issues, or unconnected issues against the current parent issue, and to delete sub-tasks, linked issues, or epic issues in bulk. Epic creation and deletion are only available on Jira Software.
Selecting a create option opens a dialog with three modes:
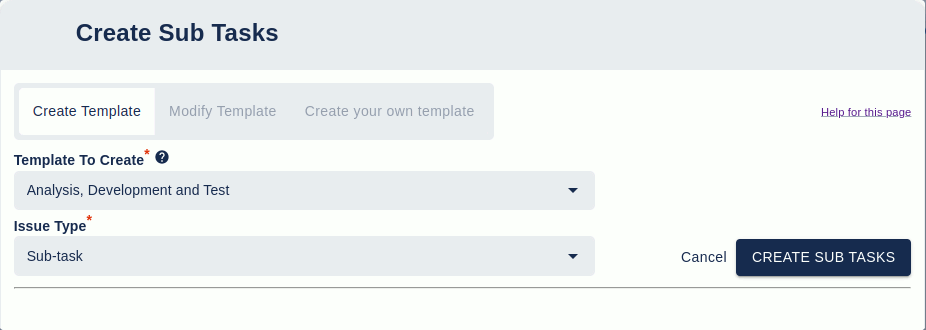
- Create Template — pick a template (any current project template or global template marked for bulk-create) plus a default issue type. For linked issues, pick the link type. Click Create.
- Modify Template — pick a template; it is shown in the dialog as a working copy. Edit it however you like and run it. The original template on disk is untouched.
- Create your own template — start from an empty template and build one inline. Useful for one-off jobs that don’t justify a saved template.
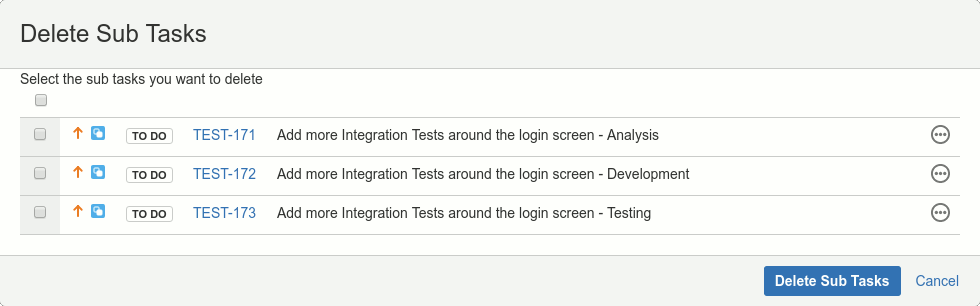
Deleting in bulk
Select a delete option from the issue menu to open a dialog of sub-tasks (or linked / epic issues). Tick the rows to remove and press Delete Sub Tasks. The three-dot button reveals more info about each issue.
From JQL (many parent issues)
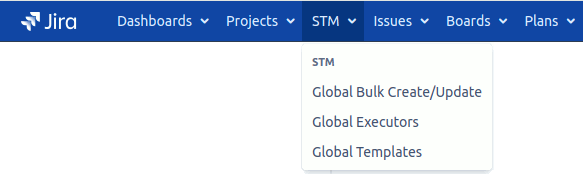
The STM Bulk Create/Update page runs a template against every issue matching a JQL query. The project version lives in the project’s add-on menu; the global version lives in the top-level Apps menu.
Cloud project menu
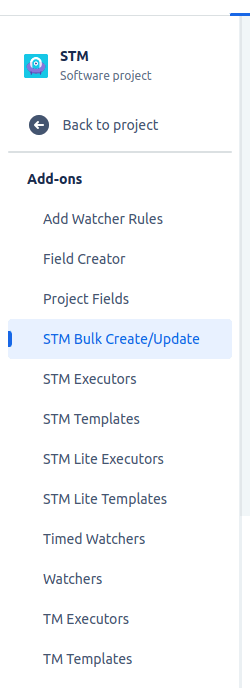
Cloud sub-menu

Data Center menu
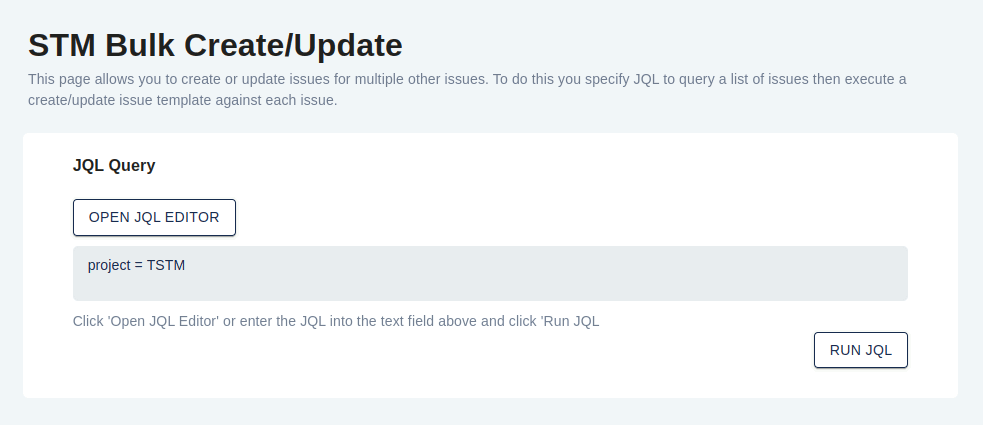
You can type JQL directly into the page or click Open JQL Editor for the full Jira JQL editor.
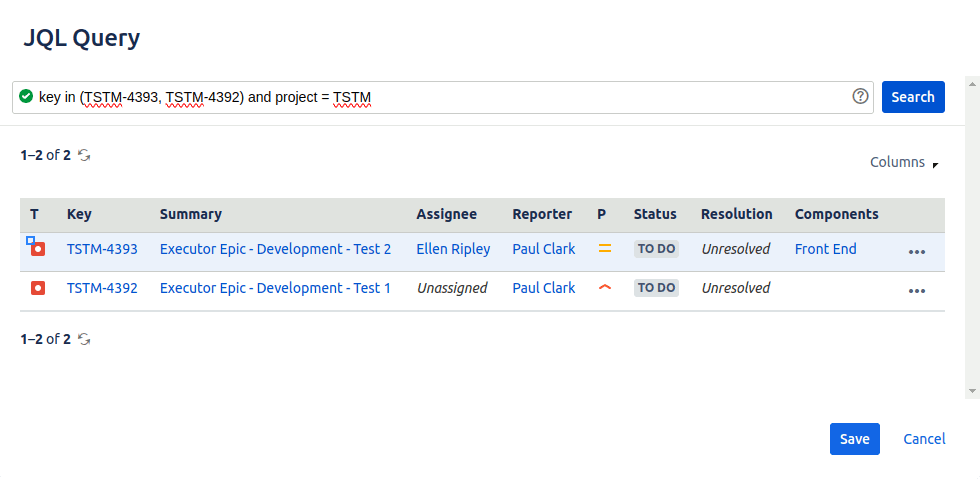
Press Run JQL to load the matching issues, then:
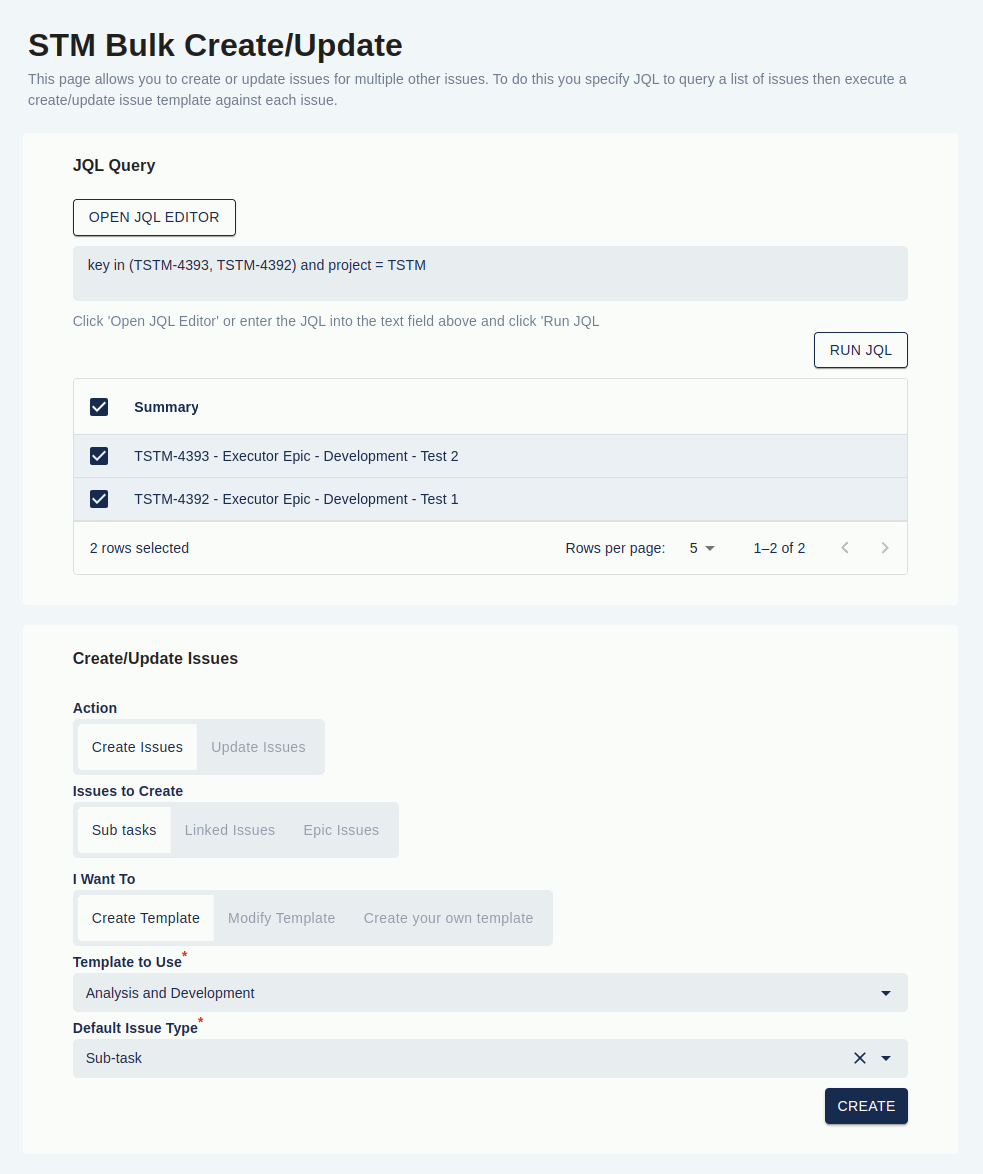
- Choose Create or Update.
- For Create: choose Sub-tasks, Linked Issues, or Epic Issues.
- Choose Use existing template, Modify existing template, or Create your own template.
- Fill in any remaining details (template, default issue type, link type).
- Press Create or Update to run the template against every matched issue.
How does STM install? Where is your data stored?
STM is sold and installed through the Atlassian Marketplace and follows Atlassian’s standard install flow for both platforms. The two editions differ in where template and executor data is held.
STM for Jira Data Center. Installed directly into your Jira Data Center instance like any other app. All STM data — templates, executors, audit history, error log — lives inside your Jira database, on your infrastructure. Nothing is sent to Redmoon’s servers.
STM for Jira Cloud. A Forge app, installed into your Atlassian Cloud site. The Forge runtime hosts the UI. Today, template and executor data is stored on Redmoon’s servers and the processing of templates and executors runs on those servers; the Forge frontend reaches them via Forge remote calls, and those servers use OAuth 2.0 (via Atlassian’s Connect / Forge authentication) to call back into your Jira Cloud instance to read or write issues. In the future we plan to move both the data and the processing onto Forge itself, so everything stays inside your Atlassian Cloud site. Communication uses HTTPS throughout. Forge controls what scopes the app can request, and you see those scopes during install.
For most enterprise security reviews this means:
- Data Center — the security boundary is your own Jira instance; STM does not introduce a new third-party.
- Cloud — Redmoon is a sub-processor for template metadata, but only Atlassian-managed Jira data flows through Forge remote calls. Issue content itself stays in your Jira Cloud instance.
If you need the formal cloud-security statement for a procurement review, see the Redmoon Cloud Security Statement.
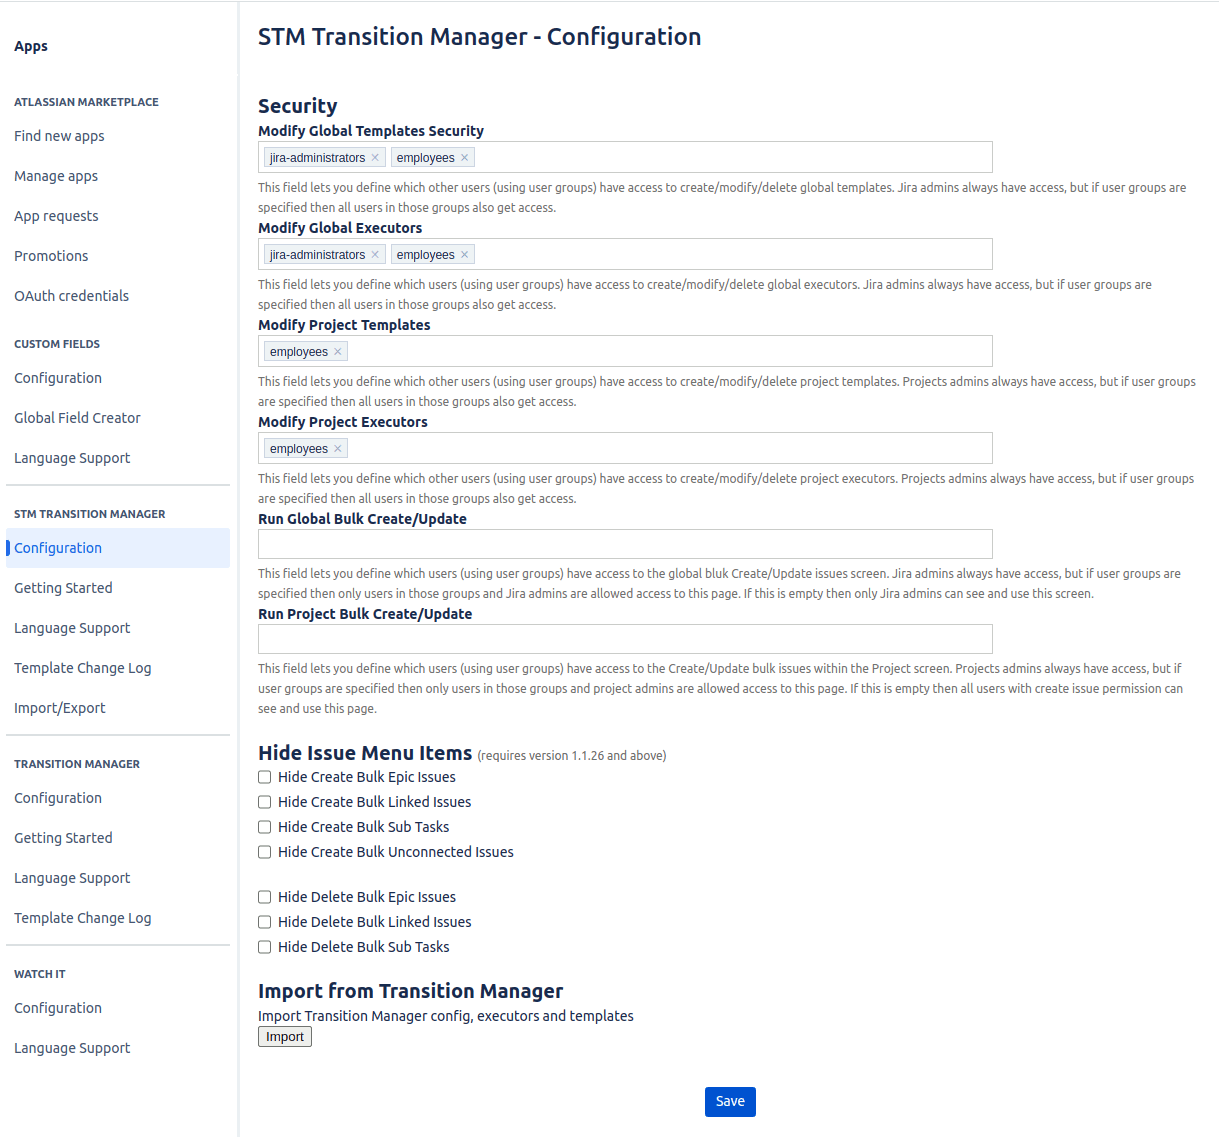
STM configuration
Access groups
The configuration screen sets who — beyond system admins (for global pages) and project admins (for project pages) — can see the Template and Executor screens. Use the two group fields below to grant access to additional user groups.
Getting Started
The Getting Started page is the recommended landing page for new STM users. It documents the common terms (Template, Executor, Action, Condition, Repeating, Cascading) and lets you create example Templates and Executors with one click — useful when evaluating the plugin.
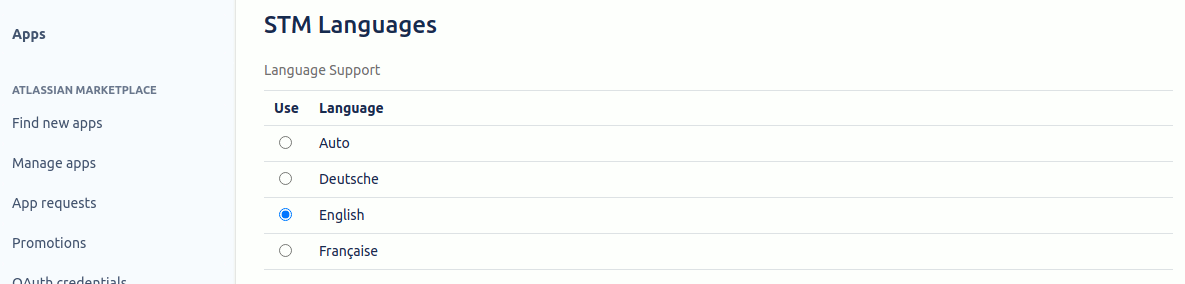
Language Support
NOTE: translations apply to all text except menu text, tab text, and panel-heading text (those are set by Jira itself).
STM ships with multiple languages and can either auto-detect the user’s locale or be set to a specific language.
Import / Export and Data Center → Cloud migration
The Import/Export page transfers templates and executors between STM instances. The most common use case is migrating from STM on Jira Data Center to STM on Jira Cloud, which is a three-step process:
- Migrate all Jira data from Data Center to Cloud using the Atlassian JCMA tool.
- On the Data Center instance, Export templates and executors from the STM Import/Export page.
- On the Cloud instance, Import the exported file from the STM Import/Export page.
The Cloud Import/Export page is shown below. The Data Center version offers Export only.
See also
- Ready-made templates: the Jira Issue Templates library — 20+ template examples covering engineering, DevOps, agile, ITSM, security, customer success.
- STM detail pages: Features · Limitations · Use Cases · Adding a Template walkthrough · Reviews · Migration guide
- Marketplace listing: STM Issue Templates on the Atlassian Marketplace